Table of Contents
Overview
Congratulations on your purchase of a FeverWarn temperature scanning system. We thank you, and we are here to support your effective use of the product. This document covers FW150 and FW250 FeverWarn scanners. Information that applies to specific models is noted throughout.
Please use this document to get your FeverWarn scanner up and running. For new FeverWarn customers, we suggest you read through the entire document before starting. If you have experience with the product and only need specific instructions, please use the Table of Contents to navigate to the information you need.
Let’s get started.


Mounting Bracket
Unpacking the Boxes
Your FeverWarn boxes should include:
- FeverWarn scanner with connection cables
- Mounting bracket
- Hardware
- Rubber feet (to optionally install on the bottom of the FeverWarn base)
Other (not in the box, but included with your purchase):
- Access to Crystalball software (one-year free access included – FW250 only)
- Access to FeverWarn app (lifetime free access included – all models)
- Technical support - Email: support@machinesense.com; Telephone: 443-457-1165
Options (purchased separately)
FeverWarn Floor Stand
Supports Models FW-150 and FW-250 Self-Service Thermal Hand Scanner (FW-FS-250)
FeverWarn Wall-Mount/Desktop Stand
Supports Models FW-150 and FW-250 Self-Service Thermal Hand Scanner (FW-WDM-250)

Floor Stand (optional)

Wall-Mount/Desktop Stand (optional)

Figure 1
Assembly
- Mount the tube onto the FeverWarn base by using 4 1/4-20 Philips head bolts, start washers, and nuts. Insert bolts from the top.
- Lay the base assembly and the head on a flat surface and thread all the cables from the head through the tube into the base.
- Make sure the back of the scanner is facing the side of the base which has the connectors and then mount the head onto the base assembly using two, (2) #10 Philips head bolts. The bolts go up through the base into the pre-threaded holes in the scanner head.
- Plug all the cables into their respective connectors in the base (Figure 1).
- Use the included rubber feet on the corners of the base if this makes sense in your final sensor placement.
- Tidy up any excess cable with the wire ties and sticky cable tie mounting pads included with the kit.
Creating a MachineSense Crystalball Account for Your FeverWarn Scanner
(Model FW250 only)
If you purchased model FW250 it can be used with MachineSense’s Crystalball software to access, review, and store collected data. If you don’t have an account, please follow the instructions below, starting with step one. If you already have a MachineSense Crystalball account, you’ll only need to onboard your new sensor. To do this, login to MachineSense’s Crystalball, navigate to the “Machines” page, and then proceed to step 5 on the next page.
- Browse to crystalball.machinesense.com and click the blue “CREATE NEW ACCOUNT” button. (Figure 2)
- On the next page (Figure 3), fill in all the fields and click the “NEXT” button.
- Next (Figure 4), enter the serial number and the machine identification ID (MAC ID) from the product registration label located on the FeverWarn scanner and click “NEXT”. This will onboard your FeverWarn and create a default location, zone, and gate, which can be changed later if desired.
- Check the “I agree to the Terms and Conditions” box on the next screen and then click on “CREATE NEW ACCOUNT” (Figure 5).
- If you have more scanners to onboard, do so now by clicking the “FEVERWARN QUICK INSTALLATION” button on the next screen (Figure 6).
NOTE: This procedure will onboard your new sensor to a default “location” (where the plant is located, i.e., “Baltimore”) and “zone” (where within the location that the scanner is placed, i.e., “Northwest Door”). If you want to change these names, see the “Customizing your Crystalball account” section in this user guide.

Figure 2

Figure 3

Figure 4

Figure 5

Figure 6
Initial Testing
- Plug the USB power adapter, which is wired into the scanner base, into a nearby standard 120 VAC outlet to power up the scanner.
- Immediately, you should see the scanner display light up faintly. As the scanner goes through the bootup process, you will see several different screens appear. After the process is complete, you should see a blue screen that says, “Ready to scan,” as shown in Figure 7.
- Place your hand about one to four inches from the scanner’s snout and hold it there for a few seconds. The screen should turn green (the GO screen), and you should hear a beep. (Figure 8). This indicates that the scanner is working correctly. If the screen turns red, it indicates that the person being scanned has a fever, and the individual should take the proper precautions.
- If everything is working as indicated above, take your scanner to its final indoor location and prepare for installation.
- If you have FeverWarn model FW250, it will record all scans to the Crystalball cloud (FeverWarn model FW150 is a standalone scanner with no cloud connectivity available) via either wired Ethernet or WiFi. If you plan to use wired Ethernet, connect an Ethernet cable from the RJ45 jack on the stand base (Figure 8) to your facility’s internet. If you’re unsure how to accomplish the connection, check with your IT department or call MachineSense’s technical support.
- If you are using existing WiFi in your facility to send your scanner’s data to the Crystalball cloud, you will also need to use the FeverWarn mobile app. Proceed to the section of the manual entitled, “Installing and Using the FeverWarn App.”
IMPORTANT: Initially, it may take a few scans to establish what it considers normal temperatures in its current environment. If you see any other indications on the screen, please call technical support.
IMPORTANT: Steps 5 and 6 pertain to FeverWarn Model F250 only.

Figure 7

Figure 8
Connecting FeverWarn Via USB Tethering
If the internet is not available to you via wired, or WiFi Ethernet, you can use your mobile device to tether your new scanner to the internet. You will also need a cable with a USB type-A connector on one end and a proper USB connector for whichever device you will be using to conduct this setup on the other end. The newer Apple devices will use a lightning connector, and modern Androids will use USB Type-C. If you are using an older device, you may need a different connector, please be sure to take a close look. Once you have the cable, follow the steps below.
- From your cellphone/tablet, navigate to the app store and search for “FeverWarn Mobile Support” for Android devices or “MachineSense IoT Support App” for iOS (Apple) devices and install it following the directions for your device.
- With the scanner powered up, and the app running connect your USB cable from your device (phone/tablet) to any available USB port on the scanner (Figure 8, see previous page).
- Go to “Settings” on your phone and turn on USB Tethering (Android Figure 9) or Personal Hotspot (iOS Figure 10). This allows the scanner to “see” the internet through your cellphone/tablet.
- If prompted to “trust this computer” respond yes.
- Your scanner should now be connected to the internet.
IMPORTANT: For iOS devices (Apple), Personal Hotspot must be activated. Some Android devices may disconnect from WiFi (by default) when attempting to connect with USB Tethering and Mobile Hotspot (mobile data must be activated).

Figure 9

Figure 10
Installing and Using the FeverWarn App
To configure your FW250 scanner to use WiFi rather than wired Ethernet to connect to the cloud, download the FeverWarn Mobile Support App from either the Apple App Store or Android Google Play Store, depending on the smart device you will use.
If you have already installed the FeverWarn app on your mobile device, check the version installed. It must be at least v1.2 for Apple devices or v1.3 for Androids to work correctly with your FW250 scanner. Before you begin to complete the steps in this section, be sure that your scanner assembly is in its final location. This way you will be able to scan for available WiFi connections in your final installation area.
- To install the app from your mobile device, navigate to the app store and search for “FeverWarn Mobile Support” for Android devices or “MachineSense IoT Support App” for iOS (Apple) devices and install it following the directions for your device.
- Tap on the app to begin. You will receive a prompt to log into your existing Crystalball account that you should have created to onboard your scanner. (Figure 11) If you did not already create your account and onboard your scanner, see the section, Creating a MachineSense Crystalball Account for Your FeverWarn Scanner (Model FW250 only) fill in your user and password then click the “LOGIN” button to continue.
- On your phone, you should see a screen similar to Figure 12. Click “CONNECT” for your new scanner and then click the “CONNECT TO DEVICE” button on the screen that follows.
- After a few seconds, you should see a screen that indicates that you have successfully connected to your scanner. If you get a failure message, try a couple more times before giving up and calling for help as sometimes the connection requires a retry or two to get it right.
- You now have two choices for connecting to your scanner (Figure 13). Click on “Connect via WiFi” and then click “START” on the following screen.
- The app will begin to ‘search’ for your scanner, and when found, you’ll see a pop-up on your screen similar to Figure 14. Your scanner will have a different WiFi network name than the one shown here. Tap the “Connect” text in the lower-right corner to connect to your scanner.
- After a few seconds, you should be connected to your scanner. Click the “NEXT” button.
- You are now on the “Dashboard screen” (Figure 15). The green bars represent recent FeverWarn scans. Tap on the three horizontal stacked lines, often referred to as the “hamburger” menu, in the upper left corner to view the app’s main menu.
- From the fly-in menu (Figure 16), click on “Network Connectivity,” which is where you will set up your scanner to send its scan data to the Crystalball cloud.
- Now you will see the WiFi connections available (Figure 17). Your available connections will be different from those shown. From the list that you see, choose a connection with a good signal strength that can reach the internet. If you are unsure about selecting the proper connection, ask your IT department for assistance. Select the connection you have determined is appropriate by tapping it.
- In this example, we have selected the “Doc Basement” connection. Figure 18 shows us the pop-up screen for our chosen connection. Fill in your Password with the correct password for the WiFi connection you selected. If you don’t know the password, seek assistance from your IT department. Once you have typed in the password, click the “Join” button.
- After a few seconds, you should be connected to the network via the chosen WiFi connection (Figure 19). The green icon on the top part of the screen confirms that all is OK.
- Your scanner will send all its scan data to the Crystalball cloud via your WiFi connection. Click the menu icon in the upper-left part of the app screen and then click “Disconnect” from the fly-in menu and click “YES” to confirm. Now you can close the app.
- You have successfully installed your scanner. It will scan for the human body temperature of anyone who puts their hand underneath the scanner snout. If you have an FW250, the scans will upload to the Crystalball cloud, where you can view scan history by logging into your Crystalball account. If you have an FW150, there is no cloud access, but you can view recent scans from the FeverWarn app by viewing the “Dashboard” screen.

Figure 11

Figure 12

Figure 13
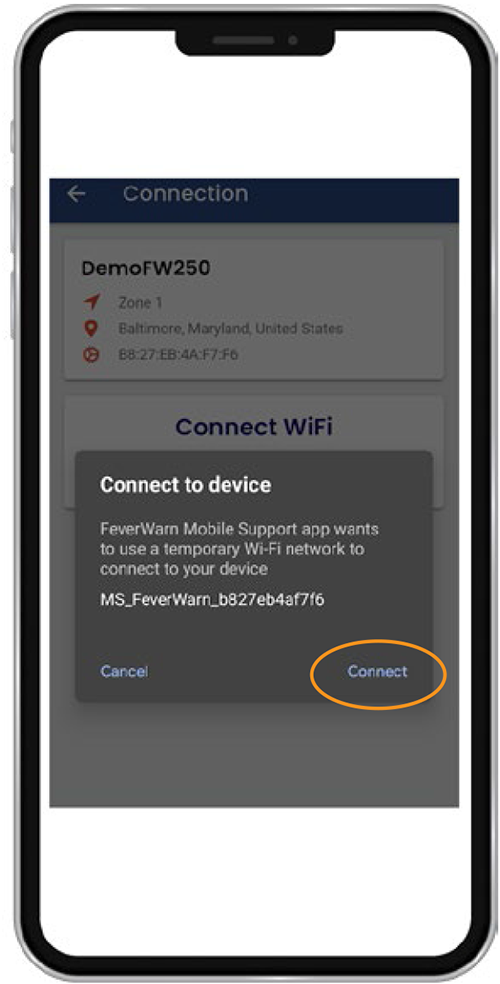
Figure 14

Figure 15

Figure 16

Figure 17

Figure 18
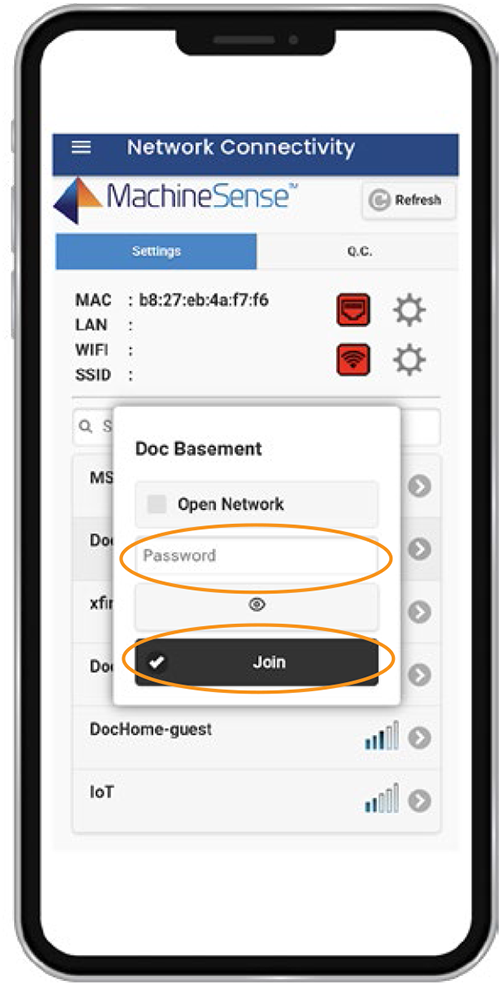
Figure 19
Connecting the FeverWarn App via USB
- After you have logged into the app, the app will begin to search for your scanner and when found you will see a screen similar to (Figure 20). Tap on CONNECT in the lower right corner to connect to your scanner
- Next click on Connect via USB (Figure 20).
- The screen shown in Figure 21 is a tethering prompt screen. If you are already connected and have tethering turned on answer YES and continue. If you do not and you are not sure how to make the connection see the section entitled, “Connecting Feverwarn via USB Tethering” in this manual. Please make sure you have completed these steps for making the connection between the device and the FeverWarn scanner. Once you are properly connected tap the YES button.
- You should now be connected from your scanner through the USB cable to your mobile device (Figure 22).

Figure 20
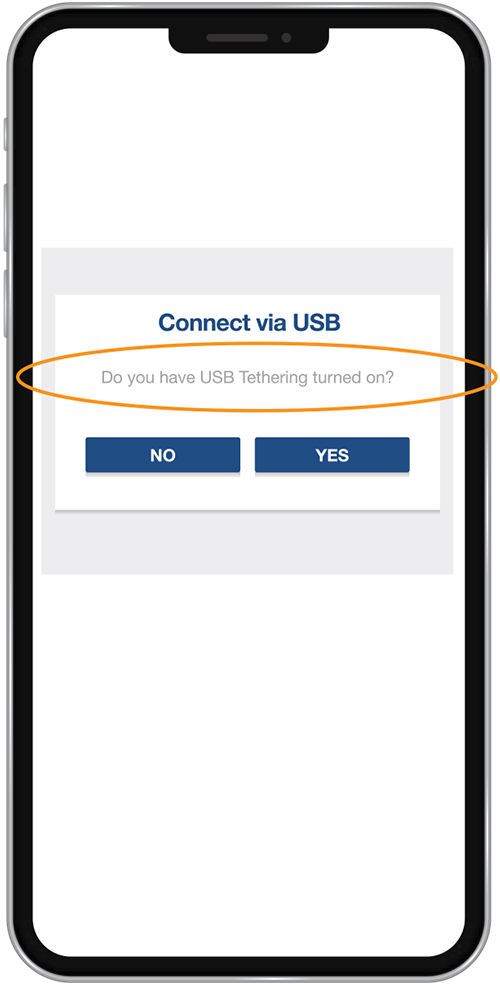
Figure 21

Figure 22
Onboarding a FeverWarn Scanner with the App
To proceed, you should have the previous instructions completed, including installing the FeverWarn app and making the connection between the app and your FeverWarn scanner
Open your FeverWarn app to proceed.
- If you do not already have an account with MachineSense, click the. “CREATE ACCOUNT” button at the bottom of the app’s opening screen (Figure 23). If you already have an account, skip to step 6.
- Tap on the app to begin. You’ll be prompted to connect your device to the scanner. Since you’ve already done this, tap the “NEXT” button to proceed. The next screen will ask you to turn tethering on, and since you did this in the previous set of instructions, tap “NEXT.”
- The next screen (Figure 24) reads the MAC address and serial number from the scanner. There should be a label on the bottom of your scanner with these numbers. Compare the numbers on the screen to the numbers on the label to be sure they match. If they match, tap the “ON-BOARD” button, which confirms to the cloud-based MachineSense management system, Crystalball, that this scanner has been recognized. Crystalball is made aware of the scanner during its QC process completed at the factory; this action completes the connection between Crystalball and the purchaser
- The app will prompt you to enter your credentials, including your name, email, company name, etc., which allows Crystalball to create a new account. Fill in the requested information (Figure 25) and then tap the “COMPLETE ACCOUNT OPERATION” button at the bottom of the screen.
- If the information has been entered correctly, you will see the “Device On-Boarded Successfully” screen, as shown in Figure 26. Note the “Please reboot your device” note just below the green circle. If you do not reboot the scanner, the connections between the scanner and Crystalball will not be realized.
- If you have an existing account and want to add a new scanner, begin here.
- When opening the app, you’ll be prompted to log in to your account. Fill in the username and password boxes and tap “LOGIN” to access your account (Figure 27).
- From the next screen (Figure 28), tap the “ON-BOARD NEW DEVICE” button at the bottom of the screen.
- The next two screens remind you to connect your phone to the scanner and ensure that you have USB tethering enabled. Make sure you have done so and proceed.
- Figure 29 is the confirmation screen. The scanner’s MAC address and serial number are shown. If the information is correct, tap the “ON-BOARD” button to onboard this device into your account.
- Finally, you will see that the device has been successfully onboarded into your account (Figure 30.
- If you have more scanners to onboard, make the necessary connections, click the “ON-BOARD ANOTHER DEVICE” button and repeat the last few steps. Continue until all your scanners have been onboarded and then tap “CLOSE” to exit the app.
IMPORTANT:MachineSense allows for one email address per customer. If you manage two or more company’s scanners, you either must put all the sensors under one account or use different email addresses for separate MachineSense accounts.
IMPORTANT: No spaces or “special” characters are allowed in the credentials fields.
NOTE: When creating a new account, default locations, zones, etc. will be assigned. You can log in to Crystalball (https://crystalball.machinesense.com/) to customize these fields.
IMPORTANT:Remember, you’ll need to reboot the scanner for the configuration to be realized.

Figure 23: If you do not have an account with MachineSense, click the “CREATE ACCOUNT” button at the bottom of the app’s opening screen

Figure 24: Compare the MAC address and serial number from the label on the scanner to the numbers on the screen to make sure they match.

Figure 25: Fill in the requested information and then tap the “COMPLETE ACCOUNT OPERATION” button.

Figure 26: If the information has been entered correctly, you will see the “Device On-Boarded Successfully” screen, as shown above.

Figure 27: Fill in the username and password boxes and tap “LOGIN” to access your account.

Figure 28: Tap the “ONBOARD NEW DEVICE” button at the bottom of the screen.

Figure 29: The above is the confirmation screen. The scanner’s MAC address and serial number are shown. If the information is correct, tap the “ON-BOARD” button to onboard this device into your account.

Figure 30: This screen displays when your device has been successfully onboarded.
Downloading Data from the FeverWarn App
(Model FW150 only)
- Connect you mobile device to the Feverwarn device by either USB tethering or via WiFi hotspot.
- Navigate to the Dashboard screen.
- Click on Download Data (Figure 31).
- Select the desired units of temperature (Fahrenheit or Celsius) (Figure 32) and duration for which you want to download date (Figure 33).
- Click on export (Figure 34).
- Enter a desired file name and click on OK (Figure 34).

Figure 31

Figure 32

Figure 33

Figure 34
Installation
Planning the Location
- Plan the location of your FeverWarn before installation.
- Carefully read the entire Getting Started with FeverWarn guide and consider the connections to be made before determining your FeverWarn components’ installation locations.
Installing the FeverWarn Scanner
- The scanner should be mounted in a convenient area for those who will be scanning their fists. The height should be about 48 inches from the floor.
- If you have an FW250 scanner and use hard Ethernet to send scan data to the cloud (rather than WiFi), connect it from the scanner’s RJ45 connector to your network infrastructure gear.
- Provide power for your scanner by plugging the included USB power adapter into a nearby 120 VAC source and plugging the proper USB cable included between the power plug and scanner. The scanner should boot up, and the screen should illuminate. This can take a few minutes during startup.
- Your sensor is now up and running. Test it by placing your closed fist, palm down, one or two inches from the sensor. A second or two later, the screen will turn green or red indicating whether your temperature is in the normal range (green), or if your temperature is elevated (red).
Recommendations for Accurate Scanning
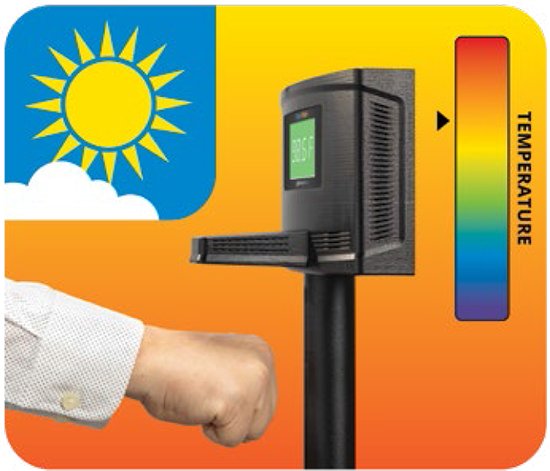
In summer-like weather: Fist
Under most conditions, a fist temperature measurement is adequate.
Steps to scan:
- Simply make a fist.
- Place your fist (or back of the hand) 2-4 inches below the scanner for two seconds (Figure 35).
- GO/NO-GO instructions will be observed by a green or red screen and an audible buzzer. A green screen means no fever has been detected, a red screen and buzzer means a possible fever has been detected and further processing is required.
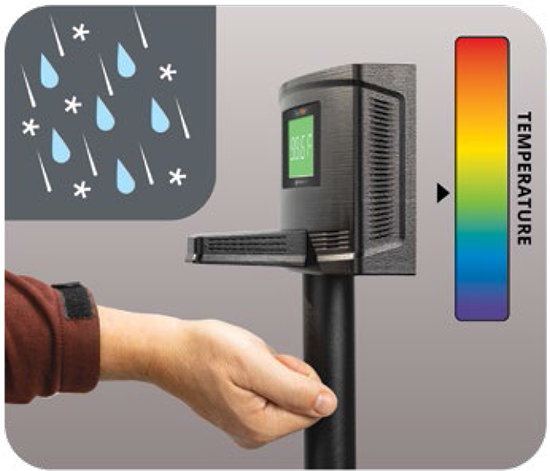
In cooler weather: Wrist
When very cold outside the individual being scanned must expose their covered wrist for an easy accurate scan.
Steps to scan:
- Simply pull up your sleeve approximately 2 inches (5 cm) above palm side (Figure 36).
- Place your inner wrist area 2-4 inches below the scanner for two seconds.
- GO/NO-GO instructions will be observed by a green or red screen and an audible buzzer. A green screen means no fever has been detected, a red screen and buzzer means a possible fever has been detected and further processing is required.
In extremely cold weather: Forearm
During extreme cold weather a forearm scan might be necessary.
Steps to scan:
- Simply pull up your sleeve approximately 2 inches (5 cm) above palm side (Figure 37).
- Place your forearm 2-4 inches below the scanner for two seconds
- GO/NO-GO instructions will be observed by a green or red screen and an audible buzzer. A green screen means no fever has been detected, a red screen and buzzer means a possible fever has been detected and further processing is required.

Customizing Your Crystalball Account
(Model FW150 only)
The procedure for onboarding your FW250 scanner makes some assumptions about scanner locations and zones that you might want to change. This section will help you customize your MachineSense Crystalball account.
- Browse to crystalball.machinesense.com and login with your established credentials.
- After logging in, you will be on the “Resources” page. Click on the hamburger menu (three stacked horizontal lines) in the upper-left area of the page and then click on “Machines” (Figure 38).
- On the Machines page (Figure 39), click on the location that you want to edit. Here, it’s “Baltimore.” From here, if you’re going to change the location name, click the three-dot menu to the right of the Location header, click “Rename,” and then type in the new location name.
- You’ll see the new FW250 scanner, “DemoFW250,” listed there in the Baltimore location. If you want to rename the machine, click the gear icon to the machine’s right, and you will see the machine’s details (Figure 40). Now, click the three-dot menu icon to the right of the pop-up banner and then click “Rename,” which will allow you to change your machine name.
NOTE:The Resources page is where you will find various documents to help you use your FeverWarn.

Figure 38
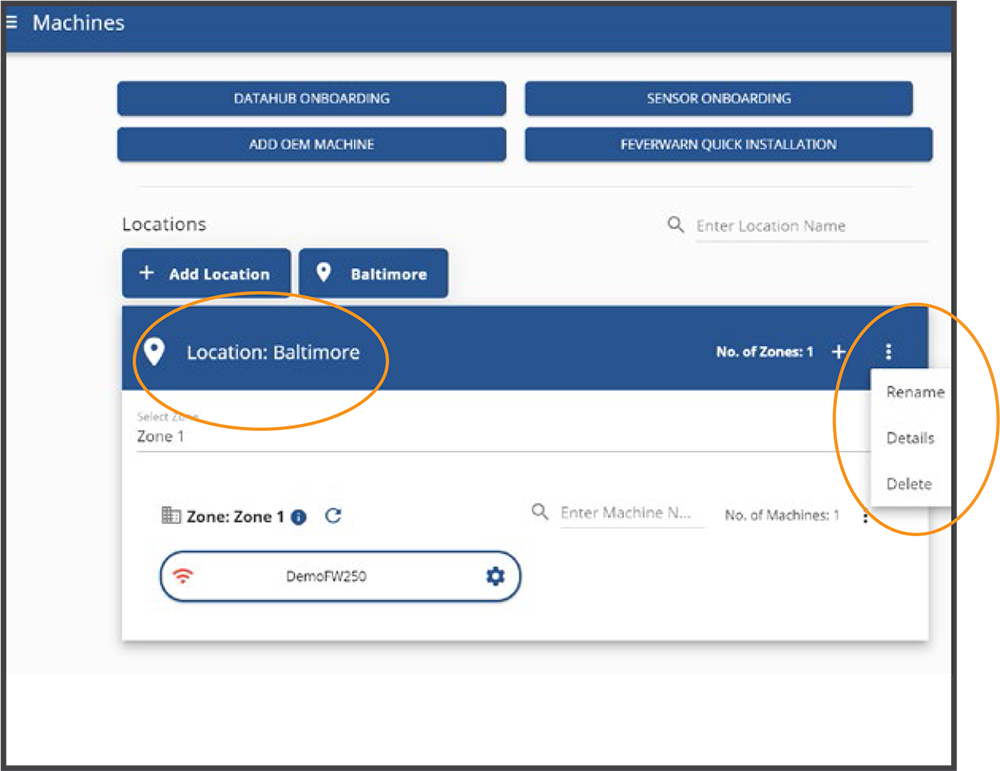
Figure 39

Figure 40
Final Words
Your FeverWarn scanning system is now 100% operational. Browse to crystalball.machinesense.com and log in with your company’s credentials to electronically access this and other helpful documentation and videos.
Should you need additional support, please contact customer support.
Contact Customer Support
- Email: support@machinesense.com
- Telephone: 443-457-1165